
Soundpad (Activation number included)
Last Updated:8-07-2024, 01:03
How to make soundpad play through mic
About
Are you ready to elevate your gaming or streaming experience? Discover how to make your Soundpad play sounds through your microphone with our easy-to-follow guide. Whether you're a content creator looking to add some flair to your streams or a gamer wanting to enhance your in-game communication, this tutorial is tailored just for you!
Step into the world of immersive audio as we walk you through the simple steps required to set up your Soundpad correctly. Say goodbye to the days of manually playing sounds and hello to seamless integration that will make your audience sit up and take notice!
Understanding Soundpad Basics
Soundpad is a powerful tool designed for playing sound effects and music through your microphone in real-time. Whether you're a streamer, gamer, or just looking to add some fun to your voice chats, understanding the basics of Soundpad is crucial for maximizing its potential.
Key Features of Soundpad
Real-Time Playback: One of the standout features of Soundpad is its ability to play sounds instantly through your microphone. This means you can react to events in your game or conversation with timely sound effects.
Customizable Sound Library: Soundpad allows you to organize your sounds into categories and playlists, making it easy to find and play the right sound at the right time. You can also import new sounds directly from your computer or the internet.
Getting Started with Soundpad
Installation and Setup: Installing Soundpad is straightforward. Once downloaded, simply follow the installation prompts. After installation, you'll need to configure your microphone settings within the application to ensure seamless integration with your audio devices.
Basic Controls: Familiarize yourself with the basic controls such as play, pause, and stop. You can also assign hotkeys to your favorite sounds for quick access during your streams or games.
By mastering these basics, you'll be well on your way to enhancing your audio experiences with Soundpad. Whether you're aiming to entertain your audience or simply add a personal touch to your voice communications, Soundpad offers a versatile and user-friendly solution.
Installing Soundpad on Your PC
Welcome to the ultimate guide on setting up Soundpad on your PC! Whether you're a streamer, gamer, or just looking to have some fun with sound effects, Soundpad is the perfect tool for you. Follow these simple steps to get started.
Step 1: Download Soundpad
First things first, you need to download the Soundpad application. Visit the official Soundpad website and click on the download button. Make sure to choose the version that is compatible with your operating system.
Step 2: Install the Application
Once the download is complete, locate the installer file on your computer. Double-click on it to begin the installation process. Follow the on-screen instructions carefully. During the installation, you might be asked to choose a destination folder for the application. It's recommended to keep the default settings unless you have a specific preference.
Note: During the installation, ensure that your internet connection is stable to avoid any interruptions. If you encounter any issues, refer to the Troubleshooting section on the Soundpad website.
After the installation is complete, you can launch Soundpad from your desktop or start menu. Congratulations, you've successfully installed Soundpad on your PC!
Now that you have Soundpad up and running, you can start exploring its features and customize it to suit your needs. Happy streaming and sound effect fun!
Setting Up Your Microphone with Soundpad
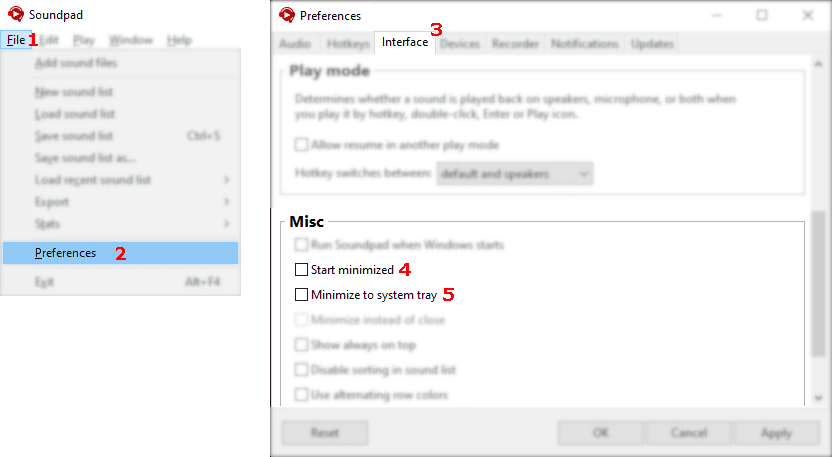
Setting up your microphone with Soundpad is a straightforward process that enhances your audio experience during gaming, streaming, or any voice-related activities. Hereâs a step-by-step guide to help you configure your microphone effectively with Soundpad.
First, ensure that your microphone is properly connected to your computer. Whether itâs a USB microphone or a traditional analog model, make sure itâs recognized by your system. You can check this in your computerâs sound settings under the âRecordingâ tab.
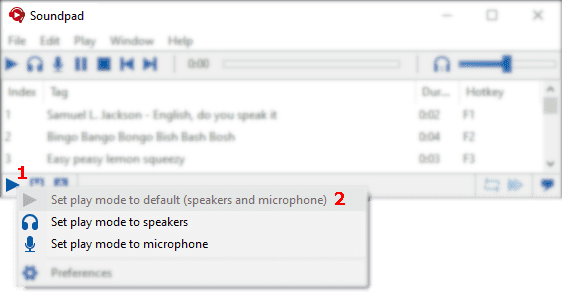
Next, open Soundpad and navigate to the settings menu. Look for the audio input settings where you can select your microphone. Make sure itâs the default device for recording. This ensures that all your voice inputs are captured correctly by Soundpad.
After selecting your microphone, adjust the input volume. Itâs crucial to find the right balance to avoid distortion or too low volume. You can test this by speaking into the microphone and observing the volume levels in Soundpad. Adjust until youâre satisfied with the clarity and volume.
Additionally, Soundpad allows you to apply various audio effects to your microphone input. These can range from simple echo effects to more complex filters. Experiment with these options to enhance your audio output according to your preference or the requirements of your audience.
Finally, save your settings and start using Soundpad with your microphone. Whether youâre playing games, hosting a podcast, or streaming content, a well-configured microphone setup will significantly improve the quality of your audio interactions.
Selecting and Adding Sounds to Soundpad
Soundpad is a powerful tool that allows you to play sound effects and music through your microphone in real-time. Whether you're streaming, gaming, or just having fun with friends, having the right sounds at your fingertips can enhance your experience. Here's a step-by-step guide on how to select and add sounds to Soundpad.
Finding Sound Files: Search for sound files online. Websites like Freesound.org, Soundsnap, and Zapsplat offer a wide range of free sound effects. Ensure the files are in a compatible format (MP3, WAV, etc.). Downloading Sounds: Download the sound files to your computer. Organize them in a dedicated folder for easy access. Adding Sounds to Soundpad: Open Soundpad and click on the Add Sound button. Navigate to the folder where you saved your sound files. Select the sound file you want to add and click Open. Organizing Your Sound Library: Rename the sounds for easier identification. Use the Move Up and Move Down buttons to organize the order of your sounds. Create categories or playlists to group similar sounds together. Assigning Hotkeys: Right-click on a sound in your library. Select Assign Hotkey and press the desired key combination. This allows you to quickly play the sound during your stream or game.By following these steps, you'll be able to build a comprehensive sound library in Soundpad, making your streams, games, and conversations more engaging and entertaining.
Configuring Soundpad Playback Settings
Setting up Soundpad to play audio through your microphone can significantly enhance your gaming experience, live streams, or online meetings. Hereâs a step-by-step guide to help you configure the playback settings in Soundpad efficiently.
First, ensure that Soundpad is installed and running on your computer. Open the application and navigate to the settings menu. Here, you will find various options to customize the audio playback through your microphone.
Under the 'Audio Device' settings, select the microphone you wish to use. This is crucial as it determines the output device through which the audio will be played. Make sure the selected microphone is the one you are currently using for your online activities.
Next, go to the 'Playback' settings. Here, you can adjust the volume levels and enable features like 'Loop Playback' if you want the audio to repeat continuously. Adjusting the 'Fade In/Out' settings can also help in making the transitions smoother during playback.
For advanced users, Soundpad offers the option to use keyboard shortcuts for quick audio playback control. Assigning specific keys to play different sounds can greatly enhance your efficiency during live sessions. Ensure these shortcuts do not conflict with other applications you might be using concurrently.
Lastly, test the setup by playing a sample audio through your microphone. This step is essential to verify that the audio is clear and the settings are correctly configured. Adjust any further settings based on your testing feedback to achieve the best audio quality.
By following these steps, you can effectively configure Soundpad to play audio through your microphone, ensuring a seamless and immersive experience during your online activities.
Using Soundpad with Online Games and Apps
Enhance Your Gaming Experience with Soundpad! Whether you're playing competitive titles like Counter-Strike: Global Offensive or casual games like Among Us, Soundpad offers a versatile way to integrate sound effects and music into your gameplay. By routing audio through your microphone, you can create a more immersive and entertaining environment for both yourself and your teammates.
Setting Up Soundpad for Game Integration
To start using Soundpad in your favorite games, you'll need to configure the audio settings correctly. First, ensure that Soundpad is installed and running. Next, open your game's audio settings and select Soundpad as your microphone input. This simple step allows any sound you play through Soundpad to be transmitted to other players in real-time.
Using Soundpad with Communication Apps
Beyond games, Soundpad also integrates seamlessly with popular communication apps like Discord and Teamspeak. This feature is particularly useful for streamers and content creators who want to add dynamic sound effects to their voice chats. Simply set Soundpad as your default microphone in these apps, and you're ready to enhance your conversations with custom sounds and music.
Note: Always ensure that your use of Soundpad complies with the rules and guidelines of the platforms and communities you are engaging with. Misuse of sound effects can lead to penalties or bans.
Troubleshooting Common Soundpad Issues
Soundpad is a powerful tool for playing sound effects and music through your microphone during live streams, gaming sessions, or online meetings. However, users may encounter various issues that can disrupt their experience. This section provides solutions to some of the most common problems faced by Soundpad users.
Sound Not Playing Through the Mic
One of the most frequent issues is the sound not transmitting through the microphone as expected. To resolve this, first, ensure that Soundpad is properly installed and updated to the latest version. Next, check your audio settings in Soundpad: go to 'Settings' > 'Audio Devices' and make sure the correct input and output devices are selected. Additionally, verify that the 'Play sound through microphone' option is enabled in the Soundpad settings.
Latency or Delayed Sound
Latency can be frustrating, especially during live interactions. If you experience delayed sound, try adjusting the buffer size in Soundpad. Navigate to 'Settings' > 'Audio Settings' and experiment with different buffer sizes to find the optimal setting for your system. Lower buffer sizes can reduce latency but may require more powerful hardware. Also, ensure that no other resource-intensive applications are running simultaneously, as they can contribute to latency issues.
By addressing these common issues, you can enhance your Soundpad experience and ensure seamless audio playback through your microphone. Remember to regularly check for updates and maintain your system for optimal performance.
Advanced Tips for Soundpad Efficiency
Soundpad is a powerful tool for playing sound effects and music through your microphone during live streams, gaming sessions, or virtual meetings. To maximize its potential, consider these advanced tips:
Optimize Sound Quality: Adjust the audio settings in Soundpad to match your hardware capabilities. Use high-quality audio files to ensure crisp sound effects. Utilize audio editing software to trim and enhance your sound clips, removing any unnecessary silence or noise. Create Custom Hotkeys: Assign unique hotkeys to frequently used sounds. This allows for quick and seamless playback during live sessions. Consider using a programmable keyboard to create complex macros for even faster access to your sound library. Organize Your Sound Library: Categorize your sounds into folders based on themes, events, or usage frequency. Use descriptive filenames to easily locate specific sounds without having to listen to each one. Utilize Soundpad's Advanced Features: Explore the scripting capabilities of Soundpad to create custom behaviors, such as random sound selection or conditional playback. Integrate Soundpad with other software like OBS Studio or Voice Mod to enhance your audio experience further. Regularly Update and Backup: Keep Soundpad updated to the latest version to ensure compatibility with new hardware and software features. Regularly backup your sound library and configuration settings to prevent data loss.By implementing these advanced tips, you can significantly enhance your Soundpad experience, making it a more efficient and enjoyable tool for all your audio needs.