R-Studio Data Recovery (Activation number included)
Last Updated:20-07-2024, 10:52
r-studio for mac data recovery
About
r-studio for mac data recovery
R-Studio for Mac Data Recovery R-Studio for Mac Data RecoveryIntroduction to R-Studio for Mac Data Recovery
R-Studio for Mac is a powerful and versatile data recovery software designed specifically for macOS users. It is developed by R-Tools Technology Inc., a company known for its advanced data recovery solutions. R-Studio for Mac is capable of recovering lost or deleted files from various storage devices, including hard drives, SSDs, USB flash drives, memory cards, and more. It supports a wide range of file systems, such as HFS+, APFS, FAT, NTFS, and exFAT, making it a comprehensive tool for data recovery on macOS.
Key Features of R-Studio for Mac Data Recovery
R-Studio for Mac comes with a plethora of features that make it an indispensable tool for data recovery. Some of the key features include:
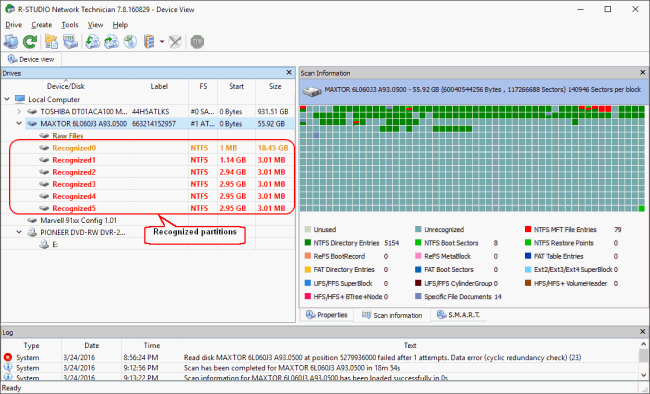
Deep Scanning: R-Studio for Mac performs deep scanning of storage devices to locate and recover lost data. It analyzes the file system and disk sectors to find traces of deleted or lost files. Advanced File Recovery: The software supports advanced file recovery techniques, including file carving and file signature search. This ensures that even if the file system is severely damaged, R-Studio can still recover valuable data. Disk Imaging and Cloning: R-Studio for Mac allows users to create disk images and clone disks, which can be useful for data recovery purposes. This feature helps in preserving the original data and working with a copy of the disk. Network Data Recovery: The software supports data recovery from remote network drives, making it possible to recover data from other computers on the same network. Hexadecimal Editor: R-Studio for Mac includes a built-in hexadecimal editor, which enables users to view and edit disk sectors at the byte level. This feature is particularly useful for advanced users and data recovery experts. File Preview: The software provides a file preview feature, allowing users to view the contents of recoverable files before actually recovering them. This helps in identifying the files that need to be recovered.How to Use R-Studio for Mac Data Recovery
Using R-Studio for Mac is relatively straightforward, but it does require some basic understanding of data recovery processes. Hereâs a step-by-step guide on how to use R-Studio for Mac:
Step 1: Install R-Studio for Mac
Download the R-Studio for Mac installer from the official R-Tools Technology website. Run the installer and follow the on-screen instructions to complete the installation process. Once installed, launch the R-Studio application.
Step 2: Select the Drive
Upon launching R-Studio, you will see a list of available drives and storage devices connected to your Mac. Select the drive from which you want to recover data. If the drive is not visible, you may need to refresh the list or check if the drive is properly connected.
Step 3: Perform a Scan
Click on the âScanâ button to initiate the scanning process. R-Studio will start analyzing the selected drive to locate lost or deleted files. You can choose between a quick scan and a deep scan, depending on the severity of the data loss.
Step 4: Preview and Recover Files
Once the scan is complete, R-Studio will display a list of recoverable files. You can use the file preview feature to view the contents of the files. Select the files you want to recover and click on the âRecoverâ button. Choose a destination folder to save the recovered files.
Step 5: Save the Recovered Files
After selecting the destination folder, R-Studio will start the recovery process. Wait for the process to complete. Once done, you can access the recovered files from the destination folder.
Advanced Usage of R-Studio for Mac Data Recovery
For advanced users and data recovery experts, R-Studio for Mac offers several advanced features and options. Here are some of the advanced usage scenarios:
Disk Imaging and Cloning
R-Studio for Mac allows users to create disk images and clone disks. This feature is particularly useful when dealing with severely damaged drives. By creating a disk image, you can preserve the original data and work with a copy of the disk, reducing the risk of further data loss.
To create a disk image, select the drive and click on the âCreate Imageâ button. Choose a destination folder and a file name for the image. R-Studio will create an exact copy of the drive, which you can then use for data recovery purposes.
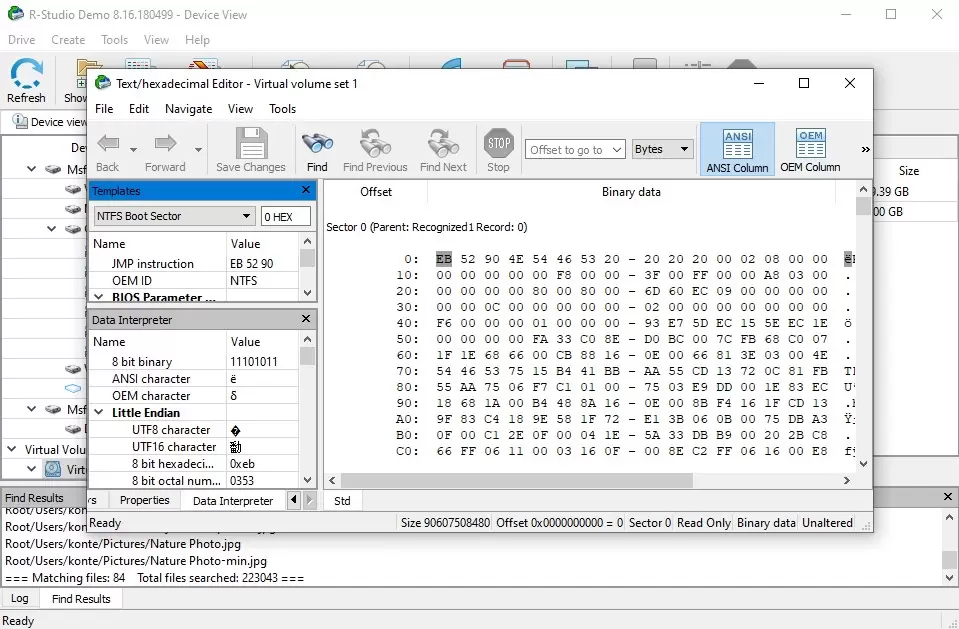
Hexadecimal Editing
R-Studio for Mac includes a built-in hexadecimal editor, which enables users to view and edit disk sectors at the byte level. This feature is useful for advanced data recovery tasks, such as repairing file system structures or manually recovering data from damaged sectors.
To access the hexadecimal editor, select the drive and click on the âHex Editorâ button. You can navigate through the disk sectors and make changes as needed. However, this feature should be used with caution, as improper editing can lead to further data loss.
Network Data Recovery
R-Studio for Mac supports data recovery from remote network drives. This feature allows you to recover data from other computers on the same network, making it a convenient option for network administrators and IT professionals.
To perform network data recovery, click on the âNetworkâ tab and enter the network drive details. R-Studio will connect to the remote drive and allow you to scan and recover data just like a local drive.
Common Issues and Troubleshooting
While R-Studio for Mac is a robust data recovery tool, users may encounter some common issues. Here are some of the common issues and their troubleshooting steps:
Drive Not Recognized
If the drive from which you want to recover data is not recognized by R-Studio, try the following steps:
Ensure that the drive is properly connected to your Mac. Try reconnecting the drive using a different USB port. Check if the drive is corrupted or physically damaged. If the drive is physically damaged, it may not be recoverable using software.Scanning Takes Too Long
If the scanning process takes too long, you can try the following steps:
Choose a quick scan instead of a deep scan. Quick scans are faster and can often locate recently deleted files. Close other applications and background processes to free up system resources. Ensure that your Mac has sufficient storage space and adequate RAM.Recovered Files Are Corrupted
If the recovered files are corrupted or unreadable, try the following steps:
Ensure that the destination folder has enough storage space to accommodate the recovered files. Try recovering the files to a different drive or storage device. Use the hexadecimal editor to manually recover the files, if possible.Conclusion
R-Studio for Mac is a powerful and versatile data recovery software that offers a wide range of features for macOS users. Whether you are a casual user or a data recovery expert, R-Studio provides the tools and options needed to recover lost or deleted files from various storage devices. With its advanced features, such as disk imaging, hexadecimal editing, and network data recovery, R-Studio for Mac stands out as a comprehensive solution for data recovery on macOS.
By following the steps outlined in this article, you can effectively use R-Studio for Mac to recover your valuable data. Remember to always handle data recovery with care, as improper actions can lead to further data loss. With R-Studio