Movavi Screen Recorder (Activation number included)
Last Updated:8-07-2024, 00:50
How does movavi screen recorder pick up sound
About
How does Movavi Screen Recorder pick up sound? It's a question on many users' minds, and the answer is both simple and impressive. With Movavi Screen Recorder, capturing high-quality audio is effortless and efficient.
Our software is designed to seamlessly integrate with your system's audio settings, ensuring that every sound from your computer, whether it's a video playing, a game in action, or a webinar, is recorded with clarity and precision. You can even choose to record system sounds, microphone input, or both, giving you complete control over your audio capture.
Experience the difference with Movavi Screen Recorder where every sound is captured just as you hear it, making your recordings professional and ready for any use, from educational tutorials to business presentations.
Understanding Movavi Screen Recorder Sound Capture
Movavi Screen Recorder is a versatile tool designed to capture your screen activities with high precision, including sound. Whether you're recording a tutorial, a gameplay session, or a video call, understanding how the sound capture works is crucial for producing high-quality recordings. This section will delve into the intricacies of sound capture with Movavi Screen Recorder, ensuring you get the best audio output.
Sound Source Options
One of the standout features of Movavi Screen Recorder is its flexibility in sound source selection. You can choose to record system sounds, microphone input, or a combination of both. This feature is particularly useful for creating tutorials where you need to capture both the audio from your computer and your voice explaining the process. The software allows you to adjust the volume levels of each sound source independently, ensuring a balanced audio output.
Noise Reduction and Audio Quality
Movavi Screen Recorder includes advanced audio processing capabilities to enhance the quality of your recordings. The noise reduction feature helps eliminate background noise, ensuring that the audio is clear and professional. Additionally, the software supports high-quality audio formats, allowing you to export your recordings in formats that preserve the original sound quality. This is essential for content creators who need their audio to be crisp and clear for their audience.
By understanding these aspects of sound capture with Movavi Screen Recorder, you can ensure that your recordings are not only visually appealing but also audibly superior. Whether you're a professional content creator or a casual user looking to capture and share your screen activities, Movavi Screen Recorder provides the tools you need to achieve excellent sound quality in your recordings.
How Movavi Screen Recorder Integrates Audio
Movavi Screen Recorder is a powerful tool designed to capture your screen activities with high precision, including audio. Whether you're recording a tutorial, a gaming session, or a video call, ensuring clear and synchronized audio is crucial. This section delves into how Movavi Screen Recorder seamlessly integrates audio into your recordings.
Audio Sources and Capture Options
Movavi Screen Recorder offers versatile options for capturing audio. You can choose to record system sounds, microphone input, or both. This flexibility allows you to tailor the audio component of your recording to fit your specific needs.
Advanced Audio Settings
For users who require more control over their audio recordings, Movavi Screen Recorder provides advanced settings. You can adjust the audio bitrate, sample rate, and channel settings to optimize the sound quality according to your preferences and the intended use of the recording.
Moreover, the software includes a noise reduction feature that helps eliminate background noise, ensuring that your audio is crisp and clear. This is particularly useful in environments where external sounds might interfere with your recording.
Setting Up Audio Sources in Movavi
One of the standout features of Movavi Screen Recorder is its ability to capture high-quality audio alongside your video recordings. Whether you're recording a tutorial, a gameplay session, or a video call, setting up the right audio sources is crucial for a professional finish. Heres how you can configure audio settings in Movavi to ensure clear and crisp sound.
Selecting the Audio Source
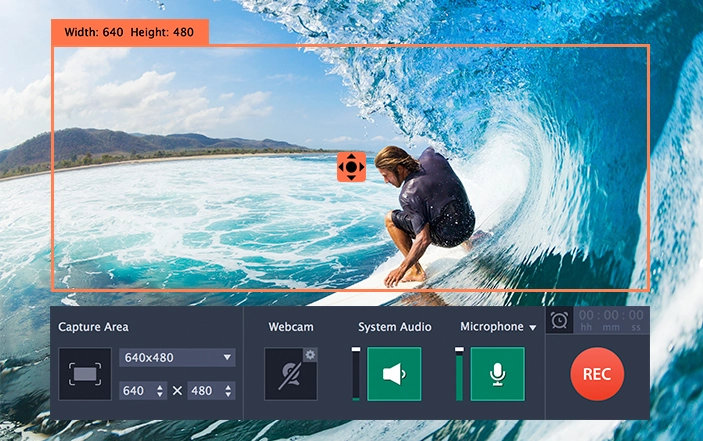
Before you start recording, it's important to select the appropriate audio source. Movavi Screen Recorder allows you to choose between different audio inputs, such as your computers system audio, microphone, or both. To select your audio source:
Open Movavi Screen Recorder. Click on the Settings icon. Navigate to the Audio tab. Select your preferred audio source from the dropdown menu.Choosing the right audio source ensures that you capture all the necessary sounds without any unwanted background noise.
Adjusting Audio Levels
Once you've selected your audio source, it's essential to adjust the audio levels to avoid distortion or inaudibility. Movavi Screen Recorder provides a simple way to monitor and tweak your audio levels in real-time. Heres how:
Start a test recording. Observe the audio level meters in the recording window. Adjust the volume slider for both system audio and microphone inputs to ensure they are within the optimal range.By fine-tuning your audio levels, you can ensure that your recordings sound clear and balanced, making them more engaging and professional.
With these steps, you can effectively set up and manage audio sources in Movavi Screen Recorder, enhancing the overall quality of your recordings. Whether you're a content creator, educator, or gamer, having control over your audio settings is key to delivering high-quality content.
Capturing System Sounds with Movavi
Movavi Screen Recorder is a versatile tool that allows you to capture not only your screen activities but also the system sounds playing on your computer. Whether you're recording a tutorial, a gameplay session, or a video call, having the audio synchronized with the video is crucial for a professional result. Here's how Movavi Screen Recorder excels in capturing system sounds:
Whether you're a content creator, a gamer, or someone who needs to record presentations with audio, Movavi Screen Recorder provides the tools you need to capture system sounds effortlessly. Try it out and enhance the quality of your recordings today!
Recording Microphone Inputs Simultaneously
Movavi Screen Recorder offers a versatile solution for capturing not only your screen activities but also your voice or any other audio inputs through your microphone. This feature is particularly useful for creating tutorials, webinars, or recording podcasts where both visual and audio elements are crucial.
Whether you're a professional looking to produce high-quality content or a beginner exploring screen recording for the first time, Movavi Screen Recorder's ability to capture microphone inputs simultaneously enhances your recording capabilities, making it an essential tool for any multimedia project.
Adjusting Audio Settings for Optimal Quality
When it comes to recording your screen, ensuring that the audio is of high quality is just as important as the video itself. Movavi Screen Recorder offers a variety of settings that allow you to fine-tune the audio capture to suit your needs. Heres how you can adjust these settings to achieve optimal audio quality.
Selecting the Right Audio Source
The first step in getting great audio is choosing the correct source. Movavi Screen Recorder allows you to select from multiple audio sources, including your computers internal sound and any external devices connected to your system. Make sure to select the source that provides the clearest and most consistent audio output.
Adjusting Audio Levels
Once youve selected your audio source, its crucial to adjust the audio levels to prevent clipping or low volume issues. Movavi Screen Recorder provides a real-time audio level meter that helps you monitor the input volume. Adjust the volume slider to keep the levels within the optimal range without peaking into the red zone. This ensures that your audio is clear and free from distortion.
By following these steps, you can significantly enhance the audio quality of your screen recordings with Movavi Screen Recorder. Whether youre recording a tutorial, gameplay, or a video call, having crisp and clear audio will make your content more enjoyable and professional.
Troubleshooting Common Audio Issues
If you're experiencing audio issues while using Movavi Screen Recorder, you're not alone. Many users encounter common problems that can be resolved with a few simple steps. Heres a guide to help you troubleshoot and fix these issues efficiently.
No Sound Detected
Check Your System Sound Settings: Ensure that your computers sound is not muted and that the volume is turned up. Go to your system tray, click on the sound icon, and adjust the settings accordingly.
Select the Correct Audio Source: In Movavi Screen Recorder, go to the settings and make sure the correct audio source is selected. If youre recording system sound, ensure that System Sound is chosen. For microphone input, select Microphone.
Poor Audio Quality
Adjust Recording Settings: If the audio quality is poor, try adjusting the bitrate in the recording settings. A higher bitrate generally results in better quality, but it also increases the file size.
Reduce Background Noise: Ensure that your recording environment is as quiet as possible. Use noise-canceling headphones if necessary, and avoid recording near loud appliances or traffic.
By following these steps, you should be able to resolve most common audio issues with Movavi Screen Recorder. If problems persist, consider checking the Movavi support forum or contacting customer support for further assistance.
Advanced Audio Features in Movavi Screen Recorder
Movavi Screen Recorder stands out not only for its exceptional screen capturing capabilities but also for its advanced audio features. Whether you're recording a webinar, a gaming session, or creating tutorial videos, the audio quality is crucial. Movavi Screen Recorder ensures that your audio is as clear and professional as your visuals.
High-Quality Audio Capture
One of the standout features of Movavi Screen Recorder is its ability to capture high-quality audio. It supports various audio sources, including system sounds, microphone input, and even line-in audio. This versatility allows you to choose the best audio source for your recording needs, ensuring that every detail is captured accurately.
Noise Reduction and Audio Enhancement
To further enhance your recordings, Movavi Screen Recorder includes built-in noise reduction and audio enhancement tools. These features help eliminate background noise and improve the clarity of your audio, making your recordings sound more professional. Whether you're dealing with ambient noise or minor audio imperfections, these tools can significantly improve the overall quality of your audio tracks.
With Movavi Screen Recorder, you can be confident that your audio will be of the highest quality, making your videos more engaging and professional. Whether you're a content creator, educator, or gamer, these advanced audio features ensure that your recordings are top-notch.
Tips for Enhancing Audio in Your Recordings
Capturing high-quality audio is crucial for creating professional-looking and sounding videos. Whether you're recording a tutorial, a webinar, or a gaming session, ensuring clear and crisp audio can make a significant difference. Here are some practical tips to enhance the audio in your recordings using Movavi Screen Recorder.
Optimize Your Recording Environment
Reduce Background Noise: Choose a quiet room for your recordings. Close windows to minimize street noise and turn off any appliances that might create background hum. Use Acoustic Treatment: Consider adding acoustic panels or blankets to your recording space to absorb echo and reverberation. Position Your Microphone Properly: Place your microphone at a distance of about 6-12 inches from your mouth. Ensure it's positioned to pick up your voice clearly without any plosives or sibilance.Adjust Audio Settings in Movavi Screen Recorder
Select the Right Audio Source: In Movavi Screen Recorder, go to the audio settings and choose the appropriate audio source. If you're using an external microphone, make sure it's selected. Adjust Audio Levels: Use the audio level meter to ensure your recording levels are neither too high (which can cause distortion) nor too low (which can make your audio hard to hear). Enable Noise Reduction: If your recording has some background noise, use the noise reduction feature in Movavi Screen Recorder to clean up the audio.By following these tips, you can significantly improve the audio quality of your recordings. Clear and professional-sounding audio will enhance the overall quality of your videos and make them more enjoyable for your viewers.