
R-Studio Data Recovery (Activation number included)
Last Updated:20-07-2024, 10:52
r-studio emergency data recovery full for macbook pro
About
r-studio emergency data recovery full for macbook pro
R-Studio Emergency Data Recovery Full for MacBook Pro R-Studio Emergency Data Recovery Full for MacBook ProIn the digital age, data is a critical asset for individuals and businesses alike. Losing this data can be catastrophic, leading to significant downtime and potential financial losses. For MacBook Pro users, R-Studio Emergency Data Recovery Full offers a robust solution for data recovery in various scenarios. This article delves into the features, benefits, and usage of R-Studio Emergency Data Recovery Full for MacBook Pro, providing a comprehensive guide to help users recover their valuable data.
Introduction to R-Studio Emergency Data Recovery Full for MacBook Pro
R-Studio Emergency Data Recovery Full is a powerful data recovery software designed specifically for MacBook Pro users. It is engineered to recover data from damaged or inaccessible storage devices, including hard drives, SSDs, USB drives, and more. The software supports various file systems such as HFS+, APFS, FAT, NTFS, and exFAT, making it versatile for different types of data recovery needs.
Key Features of R-Studio Emergency Data Recovery Full for MacBook Pro
R-Studio Emergency Data Recovery Full boasts a range of features that make it a go-to solution for data recovery on MacBook Pro:
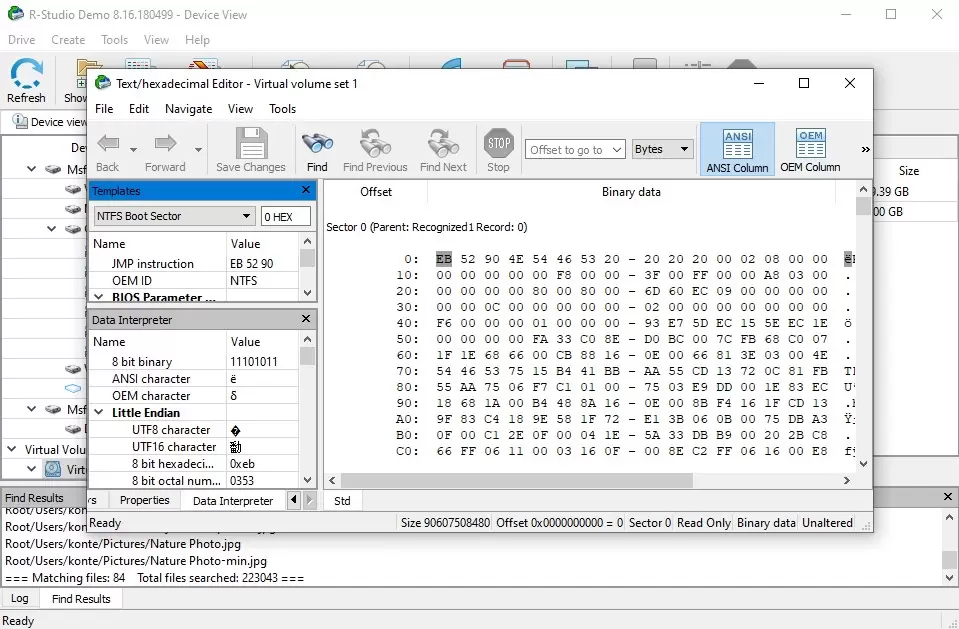
Advanced Disk Scanning: The software employs advanced algorithms to scan and analyze storage devices thoroughly. This ensures that even deeply buried or partially overwritten files are identified and recoverable. Support for Multiple File Systems: R-Studio supports a wide array of file systems, including HFS+, APFS, FAT, NTFS, and exFAT. This versatility ensures that users can recover data from various types of storage devices and file systems. Network Data Recovery: The software allows for data recovery from remote network drives, making it a convenient option for users who need to recover data from networked MacBook Pro systems. RAID Reconstruction: R-Studio can reconstruct RAID arrays, enabling the recovery of data from complex storage configurations. Hexadecimal Editing: Advanced users can utilize the hexadecimal editing feature to manually recover data, providing a deeper level of control over the recovery process. Secure Data Wiping: In addition to data recovery, R-Studio offers secure data wiping capabilities, ensuring that sensitive data is permanently erased from storage devices.Benefits of Using R-Studio Emergency Data Recovery Full for MacBook Pro
R-Studio Emergency Data Recovery Full offers several benefits that make it an indispensable tool for MacBook Pro users:
Efficient Data Recovery: The software's advanced scanning and recovery algorithms ensure efficient data recovery, minimizing downtime and data loss. User-Friendly Interface: Despite its powerful capabilities, R-Studio features a user-friendly interface that makes it accessible to both novice and experienced users. Cost-Effective Solution: R-Studio provides a cost-effective data recovery solution compared to professional data recovery services, making it an attractive option for budget-conscious users. Support for Various Devices: The software supports a wide range of storage devices, ensuring that users can recover data from different types of hardware. Data Security: With its secure data wiping feature, R-Studio ensures that sensitive data is permanently erased, safeguarding user privacy and compliance with data protection regulations.How to Use R-Studio Emergency Data Recovery Full for MacBook Pro
Using R-Studio Emergency Data Recovery Full for MacBook Pro involves several steps. Hereâs a detailed guide on how to use the software for data recovery:
Step 1: Install R-Studio Emergency Data Recovery Full
Begin by downloading the R-Studio Emergency Data Recovery Full software from the official website. Follow the installation instructions to install the software on your MacBook Pro. Ensure that you have administrative privileges to install the software.
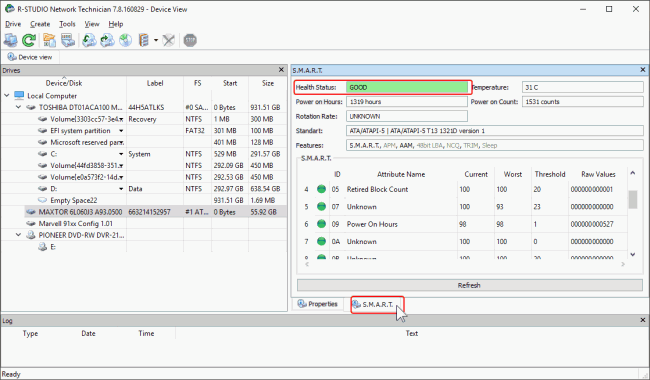
Step 2: Launch R-Studio and Select the Target Device
Once the installation is complete, launch the R-Studio software. On the main interface, you will see a list of available storage devices connected to your MacBook Pro. Select the target device from which you want to recover data. If the device is not listed, ensure it is properly connected and recognized by your system.
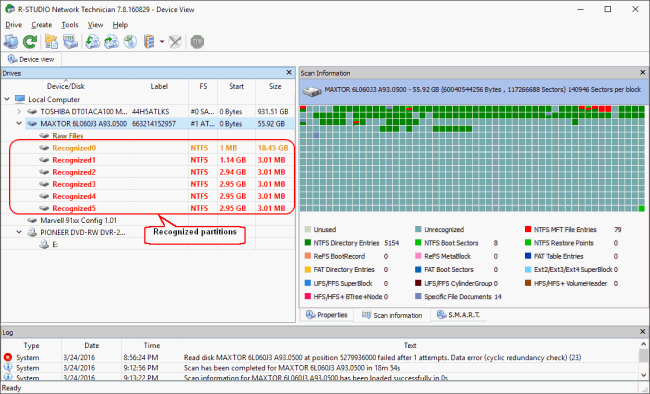
Step 3: Initiate a Scan
After selecting the target device, initiate a scan by clicking on the "Scan" button. R-Studio will prompt you to choose the scanning mode. You can opt for a standard scan or a more thorough deep scan, depending on the severity of the data loss.
Step 4: Analyze Scan Results
Once the scan is complete, R-Studio will display the scan results, showing recoverable files and directories. You can preview the files to ensure their integrity and relevance. Use the filtering and sorting options to locate specific files or directories.
Step 5: Recover Data
Select the files and directories you want to recover. Click on the "Recover" button to initiate the recovery process. R-Studio will prompt you to choose a destination folder for the recovered data. Ensure that the destination folder is on a different storage device to avoid overwriting the original data.
Step 6: Verify Recovered Data
After the recovery process is complete, verify the recovered data to ensure its integrity and completeness. Open the recovered files and directories to confirm that they are intact and functional.
Common Scenarios for Using R-Studio Emergency Data Recovery Full for MacBook Pro
R-Studio Emergency Data Recovery Full is useful in various data loss scenarios. Here are some common situations where the software can be employed:
Scenario 1: Accidental Deletion
Accidental deletion of files and directories is a common occurrence. R-Studio can recover accidentally deleted data, provided that the storage device has not been heavily overwritten. Follow the steps outlined above to recover deleted files.
Scenario 2: Corrupted File System
A corrupted file system can render data inaccessible. R-Studio's advanced scanning capabilities can identify and recover data from corrupted file systems. Initiate a deep scan to locate and recover the affected files.
Scenario 3: Hard Drive Failure
Hard drive failures can lead to significant data loss. R-Studio can recover data from failed hard drives, including those with physical damage. Connect the failed hard drive to your MacBook Pro using an appropriate adapter and follow the recovery steps.
Scenario 4: Virus or Malware Attack
Virus or malware attacks can corrupt or delete data. R-Studio can recover data affected by such attacks. Ensure that your MacBook Pro is free from malware before initiating the recovery process.
Scenario 5: RAID Array Failure
RAID array failures can result in complex data loss scenarios. R-Studio's RAID reconstruction feature can help recover data from failed RAID arrays. Follow the specific steps for RAID recovery within the software.
Tips for Maximizing R-Studio Emergency Data Recovery Full for MacBook Pro
To maximize the effectiveness of R-Studio Emergency Data Recovery Full for MacBook Pro, consider the following tips:
Tip 1: Regular Backups
Regularly back up your data to minimize the risk of data loss. Use Time Machine or other backup solutions to create periodic backups of your important files and directories.
Tip 2: Use R-Studio Early
Initiate data recovery using R-Studio as soon as you detect data loss. Early intervention increases the chances of successful recovery, as further data writes can overwrite the lost data.
Tip 3: Careful Handling of Storage Devices
Handle storage devices with care to avoid physical damage. Avoid exposing the devices to extreme temperatures, moisture, or physical shocks, which can compromise their integrity.